The project is now at an advanced stage and the final roof is now being modelled. I have therefore taken a set of photos showing the work-in-progress and have added a brief description which I hope will clear up any confusion.

Photo 1 - the DAS modelling clay is spread on over a coat of diluted PVA glue, in small biscuit sized pieces and pressed down with my finger. At this stage I am not trying to shape the DAS, just cover the whole roof.

Photo 2 - I have used a modelling tool to smooth the DAS and ensure that all sections are covered and that the DAS is pressed home.

Photo 3 - I am now adding 'sausage's' of DAS to amend the shape of the thatch and ensure that the organic shape of natural thatch is modelled as accurately as possible,
 Photo 4 - the rough shape is now achieved, the roof area is fully covered with DAS and the sides and bottom of the thatch have been 'beefed-out'.
Photo 5 - shows the start of the 'combing action'. In the early stages I comb the DAS down from the apex to the base, later I prod or poke the DAS with the blade of the modelling tool.

Photo 6 - the combing complete. (I still need to model the apex section, this I will do once the DAS has fully hardened).
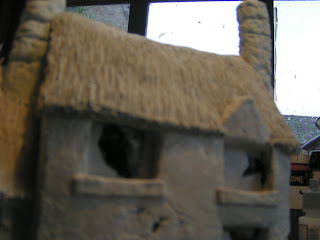
Photo 7 - although not a great photo, it does show how I model the over-hang of the thatch, I use a blunt cocktail stick to prod the clay in an upward motion, creating texture as well as subtly shaping the still wet DAS.

Photo 8 - shows the modelling tool I have used.
Tony


1 comment:
This is indeed a great tutorial. Thanks for sharing your steps in creating a thatched roof. I think I will try to make a thatched roof on my houses. Thanks again.
Post a Comment